AutoAssign: Creating Rules to Automatically Organize Email
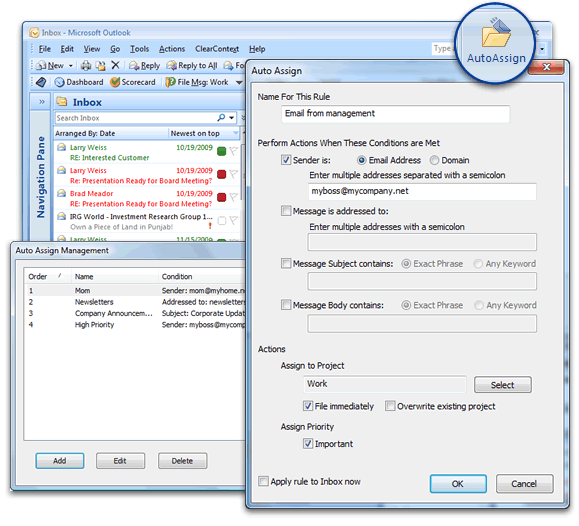
ClearContext AutoAssign functionality lets you create rules to automatically prioritize and/or file your incoming email based on parameters that you set. By using AutoAssign, you can easily organize messages such as newsletters, business email, and personal correspondence. AutoAssign rules take precedence over AutoFile rules. When a message is received that meets the criteria of both and AutoAssign and an AutoFile rule, the AutoAssign rule will be applied.

Types of AutoAssign Rules
Create an AutoAssign rule by selecting the AutoAssign button by accessing AutoAssign in the ClearContext options menu. AutoAssign rules can be created based on any combination of the factors below. In italics, we have highlighted examples of the types of email messages that might be filed using these rules.
- Sender email or domain address - These parameters are used to execute a rule based on the email address or domain that sent the email. Enter multiple addresses separated by a comma. Designate emails from your boss with a
project such as Work. Designate messages from a certain domains as a
project such as Newsletter and automatically file them out of your inbox where you can read them later.
- Message is addressed to - This parameter can be used to apply a rule to an incoming message based on who the message has been sent to. Enter multiple addresses separated by a comma.
Categorize emails sent to both you and your boss with project Management.
Use Mark Important to assign a priority to messages
sent to a business or private email address so these emails are automatically highlighted in your Inbox.
- Keywords contained in the message body or subject - ClearContext can search incoming messages for keywords that you designate. Designate an exact phrase or multiple keywords via the radio buttons above the rule. Set the project for regularly received emails with a certain subject (like "Order Information") to a project such as Receipts and automatically file these messages. Search for keywords such as a stock symbol or major client name and Mark these messages Important.
AutoAssign Actions
The following actions can be taken on messages that meet the criteria you designate in the AutoAssign rule:
- Assign to project - designate a specific project to be set for these messages. This
project can be used to both identify messages by project in the Inbox and for automated filing.
- Assign Priority - assign a priority to these messages. This priority will set the color of messages in your Inbox.
- File Immediately - messages processed by the rule can be automatically filed to the designated
project folder. This is very useful for messages such as Newsletters and Mailing Lists that can be automatically moved out of the Inbox into their own folders.
- Overwrite existing project – this forces the rule to overwrite the project on messages that are part of a thread with a previously assigned project name.
Managing Multiple Rules
The AutoAssign Management Dialog allows the user to create and maintain AutoAssign Rules. The dialog can be accessed directly from the ClearContext Menu (ClearContext > AutoAssign Management). Use the arrows on the right hand side of the window to move a rule up or down in priority. Once a single rule is executed against a message, the following rules are ignored. To execute all rules against the inbox, click the Apply Rules to Inbox button on this dialog.
Toolbar Customization
By default, the Inbox toolbar does not include the AutoAssign button. If you find yourself creating many rules, add it to the toolbar via toolbar customization.